Self-Hosted Installation
Introduction
Because Nanitor believes in making things easy for their customers, including meeting them where they are, we offer both a cloud-hosted solution, where we take care of everything, and a self-hosted option where the customer has full ownership and control.
For a pro/con analysis on cloud vs. self-hosted, as well as for the process to move to the cloud later, check out Migrating from a self-hosted to a cloud-hosted solution - Nanitor Knowledgebase
One of the main advantages of self-hosting your Nanitor instance is complete control over your instance, including where your data is processed, etc. However, this also comes with complete responsibility for the server running your instance, the operating system on it, and the network connection of your instance, especially when it comes to sizing your server and performance-tuning it. We will, of course, help you as much as we can, but there are many limits to what we can do with self-hosted instances, and ultimately, the responsibility is yours.
All the Nanitor-hosted instances run on a Debian 12 server, using an image we get directly from the Debian Org. This is therefore the only setup we have any experience with, and thus these instructions are based on that. Our product should work on any Debian- or Red Hat-based Linux distribution. We have performed limited testing on both Ubuntu, Alma, and Red Hat Linux, and they all seem fine. If you have any issues with your favorite flavor of Linux, please submit a support ticket, and we will do our best to help you.
Please note that we do not yet support Debian 13, nor any Debian based distribution that doesn't support libpcre3.
At a high level, the installation consists of the following:
- Install prerequisites nginx, curl and libpcre3 (debian) or pcre/pcre2 (RHEL/Alma)
- Install PostgreSQL 15 Server with client and utilities
- Set PostgreSQL access permissions to trust local connections
- Tune PostgreSQL Server configuration for optimal performance. We recommend using PGTune to calculate the best settings for your site. [Optional]
- Download and run the installation script.
See the next section for detailed instructions on completing these steps for Debian 12, Ubuntu, Alma, or Red Hat. If you are an experienced sysadmin, you should be able to translate these to your flavor of Linux using the above goals as guidelines; otherwise, we suggest you reconsider going with a Nanitor-hosted solution.
We recommend using PGTune to calculate the best settings for your site and make the necessary adjustments to your postgresql.conf file. However, this is optional if you are happy with the system's performance. The settings we implement work well across a wide range of setups.
Prerequisites
The only prerequisites that are not explicitly taken care of in the installation instructions below (but are kind of implied) are that the system you are using needs to be able to reach an update package repository (for apt update, upgrade, and installs), as well as reach nanitor.io for file downloads and hub.nanitor.com for signature updates.
There are no partition requirements, and the sizing of your server will depend on your environment. Here are a couple of sample sizes to guide your decision.
Server Size 150 Assets
2 vCPU
8 GB RAM
80 GB Disk
Server Size for 15K Assets
12 vCPU
32 GB RAM
250 GB Disk
Installation
These instructions assume you already have a fresh Linux server setup ready to go. These directions were written for the Debian 12 operating system and have only been tested on Debian 12. If you have something else, you may need to make adjustments to make it work with your operating system, particularly regarding paths, package names, and package managers (apt vs yum).
Log in to your new Linux server using a sudo-capable account and execute the following commands.
The last line is the actual server installation, and it prompts you for three things.
- Organization name: What do you want your instance to be called? While there is no limit, it is advisable to choose something short. If your organization has a common acronym or a short nickname, that might be a good choice here. Note that all symbols and special characters will be stripped, and spaces will be replaced with dashes. Also, all characters will be lowercase only.
- Hub Username: Get this from your Nanitor Contact
- Hub Password: Get this from your Nanitor Contact
Important: Before you run that installation line, figure out what your internal FQDN for the installation will be and replace demo.nanitor.local with your actual FQDN
Run the following commands as root.
apt install -y postgresql postgresql-contrib nginx curl libpcre3
curl -o /etc/postgresql/15/main/pg_hba.conf https://nanitor.io/files/postgresql/pg_hba.conf
systemctl restart postgresql

# Adding the nanitor APT repository.
echo 'deb https://deb.nanitor.com/nanitor-server bookworm main' > /etc/apt/sources.list.d/nanitor-server.list
curl -o  /etc/apt/trusted.gpg.d/nanitor.gpg.asc  https://deb.nanitor.com/nanitor-agent/DEB-GPG-KEY-nanitor
apt update

apt -y install nanitor-server

/opt/nanitor-server/bin/nanitor-server-ctl server_install --nanitor_hostname demo.nanitor.local

# We recommend using unattended-upgrades and configure it to automatically upgrade nanitor.
apt -y install unattended-upgrades

# Then edit /etc/apt/apt.conf.d/50unattended-upgrades and a line like this into Unattended-Upgrade::Origins-Pattern:
# "origin=nanitor-server,codename=${distro_codename},label=nanitor-server";

# Then run unattended-upgrade and make sure there are no errors in the output. Now the Nanitor Server will update itself when it applies security updates and such to the server.
# Install PostgreSQL database
dnf -y install glibc-all-langpacks
localectl set-locale LANG=en_US.utf8

dnf -y install postgresql postgresql-server postgresql-contrib curl nginx dmidecode pcre pcre2 tar

# Ensure the locale is en_US.utf8 as that is what Nanitor expects.
PGSETUP_INITDB_OPTIONS="--locale en_US.utf8" /usr/bin/postgresql-setup --initdb
curl -o /var/lib/pgsql/data/pg_hba.conf https://nanitor.io/files/postgresql/pg_hba.conf

systemctl enable postgresql
systemctl start postgresql

# Selinux needs to allow the nginx proxy_pass to nanitor-api, nanitor-uiapi and others.
setsebool httpd_can_network_connect 1 -P

# Allow inbound https in the OS firewall.
firewall-cmd --permanent --add-port=443/tcp
firewall-cmd --reload

# Install nanitor from the package repositories.
rpm --import https://yum.nanitor.com/RPM-GPG-KEY-nanitor
curl -so /etc/yum.repos.d/nanitor-server.repo https://yum.nanitor.com/nanitor-server/rhel-9-x86_64/nanitor-server.repo
yum -y install nanitor-server

# Finish the installation.
/opt/nanitor-server/bin/nanitor-server-ctl server_install --nanitor_hostname demo.nanitor.local

# Installer puts the nginx config in place, but does not start it.
systemctl enable nginx
systemctl start nginx
Post Installation
TLS Certificate
Cybersecurity has come a long way in the last few years in securing web connections. This additional security makes it much harder to use self-signed certificates than it was a few years ago. If you have the infrastructure and knowledge to use self-signed certificates, go ahead. If you don't, you may need to install a trusted certificate. For that, follow Installing a Custom Certificate, then come back here and finish the installation.
Log in
Log in to the system with the credentials displayed at the end of the setup process, and change the password to something very strong, as this is the super admin account with access to everything. We recommend a minimum of a 25-character string. Then add TOTP MFA to this super admin account.
Set up email relay
Before you can do anything else, you need to ensure that the system can send email. This is critical for tasks like setting up new local accounts. The next step in your setup is to configure your email relay. Here is how you do that. (First, make sure you are still logged in as the super admin)
Start by clicking on the gear icon in the top right and select System management

Then click on the System Settings on the left-hand side, and fill out the information for the highlighted fields
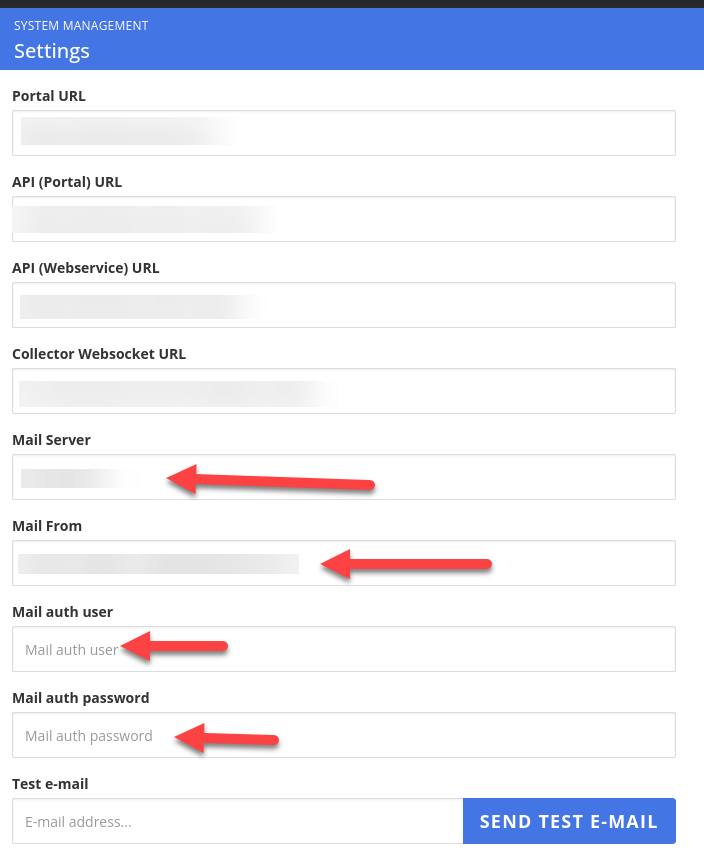
Once you have entered the correct information, enter your email address in the "Test e-mail" field and click "Send test e-mail" to test whether the new configuration is working correctly.
Add users
Once you have configured your email settings and tested that they work correctly, start inviting users to the system. For instructions on adding users to your installation, check out "How do I create a new user in my organization?" - Nanitor Knowledgebase
If you want to set up SAML SSO, check out Setting up SAML (generic) as well as User Management section.
Keeping Nanitor Up to Date
Once installed, keep your Nanitor Server up to date using the standard package manager for your distribution:
- Debian / Ubuntu — How do I upgrade the Nanitor server?
- RHEL 9 / Rocky Linux 9 / AlmaLinux 9 — Upgrading Nanitor Server on RHEL 9 / Rocky Linux 9 (includes automated upgrade setup via systemd timers)